Research Cell
Mechanical and Electronics Related Information and DIY Projects
In this tutorial, I am going to teach you about following things
At the end of this article, I will also show you a very basic and simple circuit to practically explain the resistor’s functionality.
I am writing this article for beginners and those people who are new to electronics. If you have never successfully understood a resistor’s functionality then here is your chance, read this tutorial from start to end and I am pretty sure even the most novice electronics student will fully understand the resistor’s functionality and won’t forget it in a lifetime.
A resistor is an electronic component that limits the flow of current within a circuit by implementing electric resistance. If we put a 1 Ohm resistor in a series of 1V current, then it will limit the maximum current flow to 1A. We can calculate the maximum allowed by a resistor at a specific voltage by this formula:
I = V / R or Amp = Volts / Resistance (Ohm)
Let me explain the functionality of a resistor with something other than electricity. Have a look at the image below:
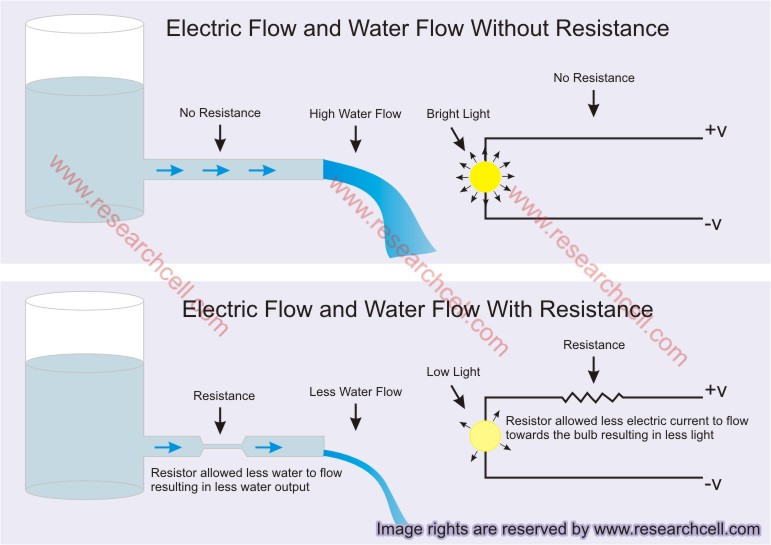
In the above image, you can see water-filled tank with a water pipe. As long as the tank is filled, water can easily flow through the attached pipe to the exit and flows out freely. The water drains in large amounts but what if you need to limit the water flow? What will you do?
In the same image, you can see another similar water tank filled with water with a similar pipe attached to it the only difference is that a pipe of a smaller diameter is attached to this pipe as a resistance. You can see the amount of water draining from this pipe is much lower than the other tank? Why is it so? After taking a look at this image, you can easily say that the pipe with a smaller diameter attached in between the big pipe is not getting enough water flow. Due to the shorter diameter of the attached pipe, less water is flowing resulting in less water output. That is easy to understand, isn’t it?
Well now let’s look at the other side of the same image; you can see two bulbs, one in the upper portion and one in the lower portion. The bulb in the upper portion is glowing brighter while the bulb in the lower portion is providing less light. Why is it so? OK use your previous experience with water tanks, if you take a close look at the image, you will see a resistor attached in between the circuit of the less bright bulb. That resistance is allowing less electric current to flow towards the electric bulb causing the bulb to glow less than the other bulb which is directly attached to the current source without any resistor.
Don’t you see any similarity between both sides of the image? In the previous image, the functionality of the pipe with a shorter diameter and the functionality of the electric resistor are the same. The pipe with a shorter diameter allows less water to flow similarly the resistor used in the way of an electric bulb allows less current to flow towards the bulb.
If you have ever seen a circuit board then I am pretty sure you have already seen resistors in one form or another. Most common forms of resistors can be easily spotted by their color bands. I have attached an image containing some common types of resistors which will give you an idea of what they may look like.

In the above image, the resistor in the center is called LDR (Light Dependent Resistor) which changes its resistance concerning the amount of light it receives. Some resistors can change their resistance concerning the temperate. They are called Thermistors. However, my current tutorial will only cover fixed and variable resistors.
The difference between fixed and variable resistors is almost self-explanatory. Fixed resistors have a fixed amount of resistance that cannot be willingly changed. This resistance is calculated in Ohms. Say if a fixed resistor is rated at 220Ohm, It will always resist electricity by the same value. On the other hand, a Variable resistor can change its resistance between the zero Ohm and the maximum Ohm value written on it. Say if a variable resistor is rated at 220Ohm, its resistance value can be changed from 0Ohm to 220Ohm by rotating its nob or by taking whatever action is necessary to change its ohm value.
I have another image below to explain the difference between fixed resistors and variable resistors.

In this image you can see two water tanks, one has a fixed smaller diameter pipe attached in the way of its main water pipe which resists normal water flow and lets less amount of water drain but this amount of water is fixed. We cannot increase or decrease the amount of resistance that this smaller diameter pipe applies to the outgoing water.
On the other hand, the second water tank has a water valve attached in between its main water pipe. This valve can be used to change water flow by increasing and decreasing resistance in the way of water flows. The same thing can be applied to electric current. A fixed resistor has a fixed resistance that cannot be changed but a variable resistor can change its resistance just like a water valve. We can rotate a variable resistor to increase or decrease current flow just like a water valve can be rotated to increase or decrease water flow.
Alright, now you know what a resistor is, what are its common types and what is the difference between them. The next step is how to read the resistor’s resistance value. It seems funny but resistor values are not always written exactly instead most of the time, the value is encoded either in color code or in printed number code.
Resistors are normally small in size, so small that it is difficult to write their actual value on such a small surface, even if it would have been written, it will be extremely difficult to read it on such a small surface area. Therefore the resistance value of a resistor is normally written on it as color code displayed as color bands. The value is normally written as 4 bands, 5 bands, or 6 band code. I have attached an image below showing color codes along with their values and calculation method of 4 band color-coded resistors.
Resistor Color Code Diagram:
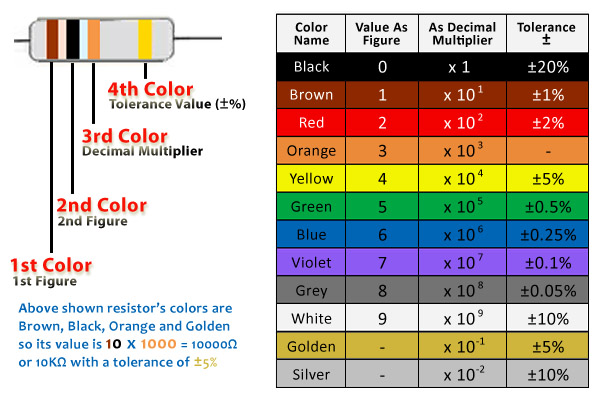
In the above image, you can see a resistor on the top left has 4 color bands on it. The left three color bands are relatively closer to one another while the right color band is at more distance. When we read a 4-band color resistor, we will start from the left side, the side with 3 close color bands. The first two colors of a 4-band resistor are the first two figures of our decoded figure and the 3rd color is a decimal multiplier which we will multiply with the first two figures to get the value of the resistor. The last and the furthermost color represents the +- tolerance of the resistor. Say if a resistor’s value is 100 Ohm and its last color is golden which means +-5% then this resistor can have a value somewhere between 95 Ohms to 105 Ohms.
In the above image, the first color of the shown resistor is brown and the value of brown in the color chart is 1 so the first figure of our decoded figure is 1. The second color band is black and the value of black is 0 therefore our second decoded figure is 0. By combining the first and second decoded figures we get 10. Now let’s look at the third decoded figure which is orange. By taking a look at the table, the orange color as a multiplier has a value of 1000 so by multiplying 10 by 1000 we get the value 10,000 Ohm so we can say that the resistor shown in the above image is a 10000 Ohm or 10K Ohm resistor.
Variable resistors and some resistors show their values as printed code. For instance, a 10K variable resistor may show its value written as 103. In this code, 10 or the first two figures are taken as they are and the 3rd figure is taken as power of10 multiplier. So (103) =10 x 1000 = 10,000 or 10K Ohm.
You can also copy or print the decoding table below in the text form
| Color | Normal Value | Multiplier Value | Tolerance |
| Black | 0 | x1 | +-20% |
| Brown | 1 | x10 | +-1% |
| Red | 2 | x100 | +-2% |
| Orange | 3 | x1000 | – |
| Yellow | 4 | x10000 | +-5% |
| Green | 5 | x100000 | +-0.5% |
| Blue | 6 | x1000000 | +-0.25% |
| Violet | 7 | x10000000 | +-0.1% |
| Grey | 8 | x100000000 | +-0.05% |
| White | 9 | x1000000000 | +-10% |
| Golden | – | x0.1 | +-5% |
| Silver | – | x0.01 | +-10% |
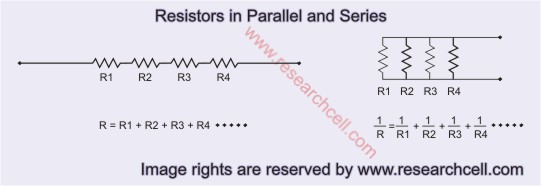
If we connect two resistors in series, their value will add up. For instance, if we connect two 1K Ohm resistors in series, their total value will become 2K. If we connect three 1K resistors in series in a circuit, their value will be 3K. To put this into the formula, R=R1+R2+R3 (R=1000+1000+1000=3000 Ohm or 3K Ohm)
On the other hand, if we resistors in parallel in a circuit, their value can be calculated using this formula, 1/R=1/R1+1/R2+1/R3…… Say we connect four 1000 Ohm (1K) resistors in parallel, their resistance value can be calculated using this formula like this. (1/R=1/1000+1/1000+1/1000+1/1000)=1/250. So their resistance value will be 250 Ohm when connected 4 of them in parallel.
To further explain it, I have attached an image below. Please have a look.
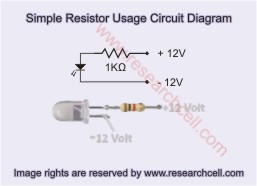
Now when you have read through my tutorial and have the most basic information about resistors, it’s time to show you a very simple circuit diagram to explain the resistor’s basic functionality. 12V power supply is one of the most common power supplies available. Most cars have a 12V battery inside them so you can test this circuit using your car battery but any other 12V power source will work as well. This circuit is so simple that it only consists of an LED and a 1K resistor. In the following image, I have shown the circuit in both forms, in a circuit diagram form as well as in a photo form showing the actual LED and actual 1K resistor connected.
For those who don’t want to learn and just want to see the color codes along with their values, I have compiled a list of the most used resistors and their color codes.
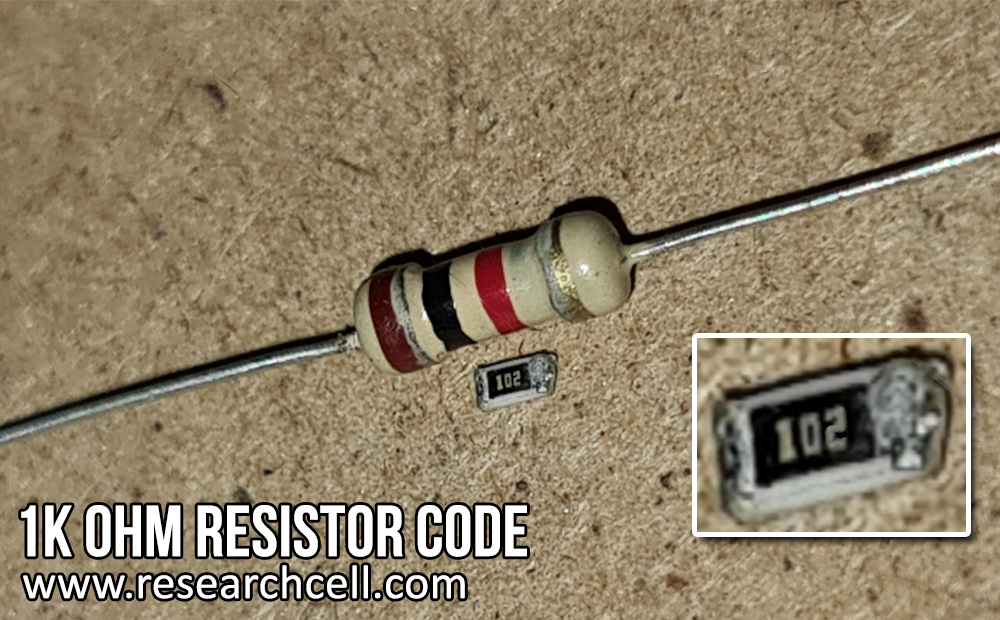
| Common Name of Resistor | 1K resistor |
| Resistance value in Ohm | 1000 Ohm |
| Maximum current at 3.3V | 3.3mA @ 10.83mW |
| Maximum current at 5V | 5mA @ 25mW |
| Maximum current at 12V | 12mA @ 144mW |
| First Band Color | Brown |
| Second Band Color | Black |
| Third Band Color | Red |
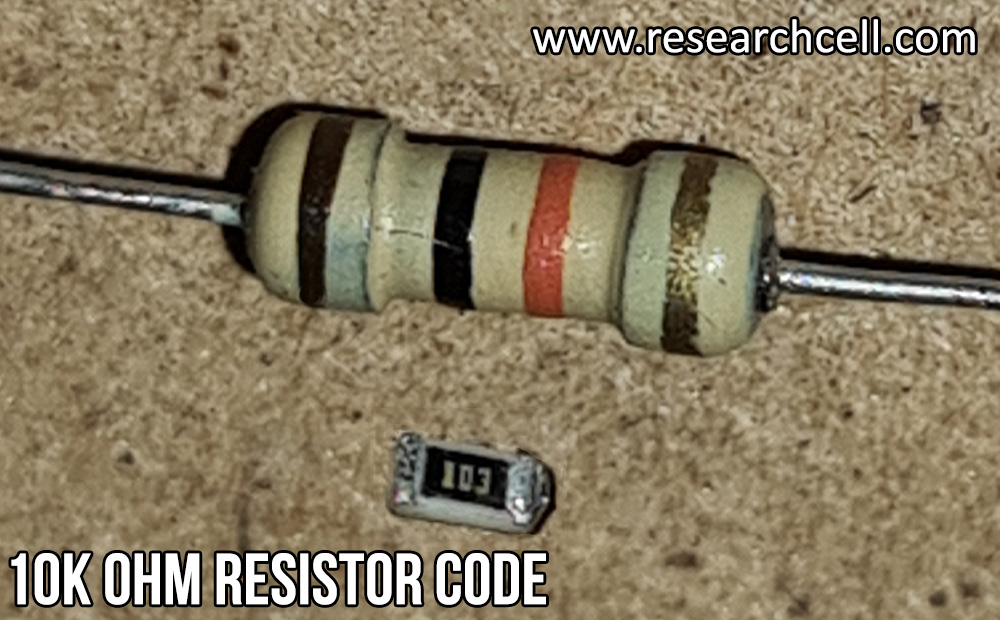
| Common Name of Resistor | 10K resistor |
| Resistance value in Ohm | 10000 Ohm |
| Max current at 3.3V | 0.33mA @ 1.08mW |
| Max current at 5V | 0.5mA @ 2.5mW |
| Max current at 12V | 1.2mA @ 14.4mW |
| First Band Color | Brown |
| Second Band Color | Black |
| Third Band Color | Orange |
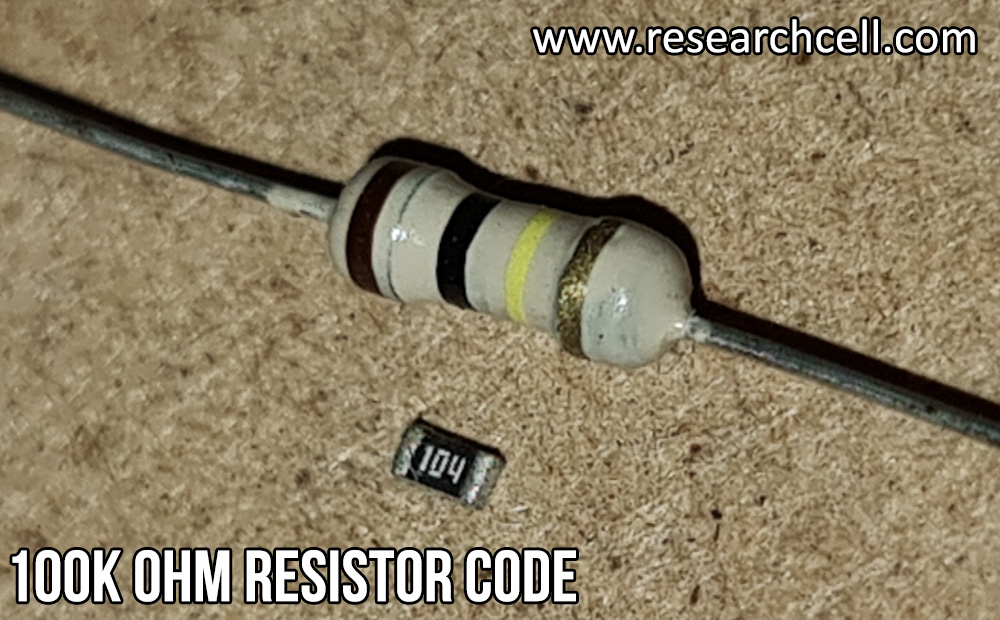
| Common Name of Resistor | 100K resistor |
| Resistance value in Ohm | 100000 Ohm |
| Max current at 3.3V | 0.033mA @ 0.11mW |
| Max current at 5V | 0.05mA @ 0.25mW |
| Max current at 12V | 0.12mA @ 1.44mW |
| First Band Color | Brown |
| Second Band Color | Black |
| Third Band Color | Yellow |
If you think this information was useful to you, please bookmark it on Facebook or any other social bookmarking websites you use so that others may also take benefit from this tutorial. Please feel free to ask questions in the comments section below.
finally I know what is the role of resistance in electricity. I had to use resistors in almost all the circuits but never had an actual idea of how they work. due to the fact that electricity is not seen by human eye, I was unable to grasp how could resistors restrict electric current flow, that water based concept actually gave me a life long understanding of how resistance works. I now officially declare you as my teacher 😉 @admin
Sir, Can I use diode instead of resistor for current limiting of LED.
Hi, everyone. I need your help me. so I need know OHM and Watt. I have old damage cabon composition resistor. 1st gray,2nd black,3rd multiplier red,4th Tolerance value(+5%)Gold answer Ohm? and Watt? Select- 1 OHM ? 15 OHM ? 220 OHM ?
1.5 OHM ? 22 OHM ? 330 OHM ?
2.2 OHM ? 33 OHM ? 470 OHM ?
3.3 OHM ? 47 OHM ? 680 OHM ?
4.7 OHM ? 68 OHM ?
6.8 OHM ? 100 OHM ?
10 OHM ? 150 OHM ?
Please if you know mark X on choose ok. Thank you for help.
what is the required value of resistor to glow led with ac supply.